


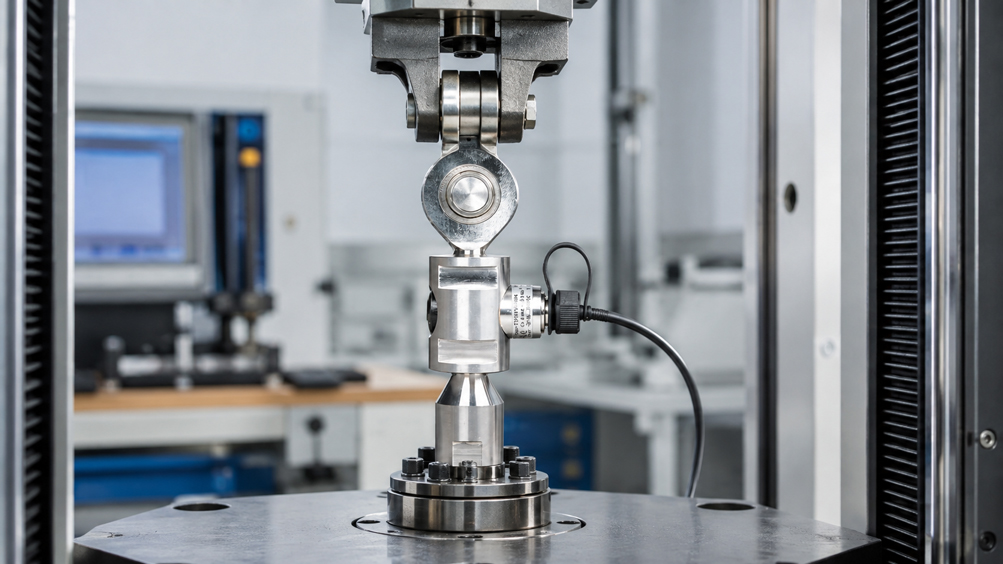
A force transducer is installed in a testing machine.
The reference value is:
10,000 kN
but the sensor indicates:
9,940 kN
Is the force transducer outside its specification?
Not necessarily.
In force measurement, the quality of the sensor alone does not determine the result.
Equally important are:
- the direction of force introduction,
- the alignment of the entire measuring axis,
- rod ends and other force introduction components,
- transverse forces and bending moments,
- preload and settling behavior,
- the sequence of load steps,
- hysteresis and repeatability,
- temperature,
- the measurement and evaluation electronics used.
A force transducer can only measure correctly the force that is actually transmitted through its measuring body along the intended measuring axis.
Even small alignment errors can generate additional:
transverse forces + bending moments + torsional moments
.
This is particularly critical with tension/compression force transducers because the same measurement chain is often intended to be used in both loading directions.
Suitable sensors can be found at ICS Schneider under WIKA Tension/Compression Force Transducers and under Force, Weighing, Speed and Torque Sensors.
Table of Contents
- How does force transducer calibration work?
- Distinguishing tension and compression calibration
- Why the force path is critical
- Aligning the force transducer precisely along the axis
- Why transverse forces cause measurement errors
- Avoiding bending moments
- Correctly using rod ends for tensile forces
- What rod ends cannot compensate for
- Correctly introducing compressive forces
- Why preloading is important
- Distinguishing conditioning preload from operating preload
- Defining load steps appropriately
- Increasing and decreasing load series
- Understanding hysteresis in force transducers
- Checking zero before and after loading
- Checking repeatability
- Calibrate the sensor or the complete measurement chain?
- Considering temperature and stabilization
- What role does DIN EN ISO 376 play?
- Measurement uncertainty in force calibration
- Recommended calibration procedure
- Typical error patterns
- Practical example: 20-kN tension/compression force transducer
- Suitable ICS products
- Conclusion
- FAQ
How does force transducer calibration work?
During calibration, the indication or output signal of a force measuring system is compared with a traceable reference force.
In principle:
Reference force → Force transducer → Electrical signal → Display / Evaluation
Reference force
The known force can be provided, for example, by:
- a force standard machine,
- a loading system with a traceable reference force transducer,
- a suitable force calibration machine
.
At each calibration point, the following are compared
FReference
with:
FIndication
Measurement deviation
In simplified form:
ΔF = FIndication − FReference
Relative measurement deviation
can, for example, be expressed as:
δ = (ΔF / FReference) × 100 %
However
This comparison is only meaningful if the force is applied under controlled mechanical conditions.
Distinguishing tension and compression calibration
A tension/compression force transducer can generally be used in both loading directions.
However, this does not automatically mean:
Calibration value tension = Calibration value compression
The mechanical boundary conditions differ
Under tensile loading, force is typically introduced through:
- threads,
- rod ends,
- tie rods,
- pin connections.
Under compressive loading
the load is frequently applied through:
- compression plates,
- compression pieces,
- spherical seats,
- central threaded force introduction.
This can result in differences in
- settling behavior,
- force introduction geometry,
- mechanical parasitic forces,
- zero point,
- hysteresis.
Therefore
If a force transducer will subsequently measure both tension and compression, both loading directions should be taken into account in the intended calibration.
Why the force path is critical
A force transducer is designed so that a defined force component deforms its measuring body.
Ideally
the force path runs as follows:
Load introduction → Sensor measuring axis → Reaction support
The force vector should
as far as possible:
be coaxial with the measuring axis
.
Problems arise with
Faxial + Ftransverse + Mbending + Mtorsion
Ideally, however, the sensor should only measure
Faxial
.
Therefore
the force value alone is not sufficient during calibration.
The direction and type of force introduction must also be controlled.
Aligning the force transducer precisely along the axis
A frequently underestimated source of error is a small offset between the upper and lower force introduction points.
Ideally
the following:
- axis of the calibration machine,
- axis of the upper force introduction component,
- measuring axis of the force transducer,
- axis of the lower force introduction component
lie on one common line.
With an axial offset
an additional moment is generated in addition to the desired force.
In simplified form
with a distance:
e
between the force line and sensor axis:
M = F × e
Example
At:
F = 20 kN
and only:
e = 2 mm
this already results in:
M = 40 Nm
This shows
Even small geometric errors can generate significant bending moments at high forces.
Why transverse forces cause measurement errors
Transverse forces act perpendicular to the intended measuring axis.
They can be caused, for example, by
- inclined tie rods,
- misaligned threads,
- tilted compression plates,
- rigid connection structures,
- cables or hoses pulling sideways.
Possible consequences
- changed measured value,
- poorer repeatability,
- zero-point shift,
- mechanical overload,
- permanent damage.
For several WIKA force transducers, ICS explicitly states
that the measuring force must be introduced:
centrally and without transverse forces
.
Avoiding bending moments
A pure tensile force loads a force transducer along its axis.
If the force is introduced off-center, an additional bending moment is generated.
Typical mistake
A tie rod is rigidly fixed on one side.
The sensor is then mechanically forced into the required position by means of the threaded connection.
In this case, even at zero force
mechanical preload can already be present.
This can often be recognized because
the zero point changes when:
- a threaded connection is loosened,
- the alignment is changed,
- a force introduction component is remounted.
Key rule
A force transducer should never be used as a mechanical compensating element for a poorly aligned structure.
Correctly using rod ends for tensile forces
Rod ends are frequently used for tensile force measurements.
Their purpose
is to permit small angular deviations of the connected tensile members.
This allows the tensile force line to align itself more effectively
and reduces the risk of additional:
- bending moments,
- constraint forces,
- mechanical stress
.
Typical arrangement
Testing machine → Rod end → Force transducer → Rod end → Testing machine
Rod ends are particularly useful
for:
- tie rods,
- spindle drives,
- testing machines,
- linear actuators,
- moving machine structures.
WIKA F2303
The:
listed by ICS is a tension/compression force transducer with a rod end and is therefore a particularly useful example of this type of axial force introduction.
What rod ends cannot compensate for
A rod end is not a universal error-compensation device.
It can accommodate small angular deviations
but cannot, for example, eliminate the effects of a permanently large:
- parallel offset,
- lateral force application,
- torsional load,
- excessive articulation angle
.
The joints themselves must also be free to move
A jammed rod end or one rotated to its end stop cannot perform its compensation function.
Observe the pins
For pin connections, the following should be appropriate for the load:
- pin diameter,
- clearance,
- bearing width,
- strength.
The objective remains
axial force without relevant parasitic loads
Correctly introducing compressive forces
Compression calibration involves different mechanical challenges than tension calibration.
Particularly important are
- parallel compression surfaces,
- clean contact surfaces,
- central loading,
- sufficient stiffness,
- no tilting.
An uneven contact surface
can cause the load initially to act on only part of the intended surface.
As the force increases
the connection settles.
As a result, the measured characteristic may appear:
non-linear
.
Remedy
Depending on the sensor type and intended installation, suitable:
- compression pieces,
- spherical seats,
- hardened plates,
- force introduction components
can be used.
However
the components used must match the force introduction specified by the manufacturer for the respective sensor.
Why preloading is important
After a force transducer has been installed, the mechanical contact points are not necessarily already in a fully reproducible condition.
The following can settle
- threads,
- rod ends,
- compression pieces,
- contact surfaces,
- pin connections.
For this reason, preloading is often performed before the actual measurement series
or the measurement chain is repeatedly subjected to a defined high force.
The objective
is a stable mechanical condition.
Without sufficient preloading
the first measurement series may, for example, differ significantly from subsequent series.
For calibration according to standards
the specific preloading procedure must be taken from the applicable standard or calibration guideline.
Distinguishing conditioning preload from operating preload
Two concepts are frequently confused.
Preloading for conditioning
Here the sensor is loaded before a calibration series in order to:
- reduce mechanical settling effects,
- condition the measuring body,
- establish reproducible initial conditions.
Operating preload
An application may, by contrast, permanently apply a basic force to the sensor.
Example
A vessel already generates:
5 kN
due to its own weight, and the actual process force subsequently varies between:
5 … 15 kN
It should then be clarified
whether the sensor or measurement chain should be evaluated over:
0 … 20 kN
or specifically over the actual operating range:
5 … 15 kN
.
Defining load steps appropriately
A calibration performed only at:
0 %
and:
100 %
of the measuring range provides only limited information.
Typical test points may, for example, be
0 % → 20 % → 40 % → 60 % → 80 % → 100 %
Depending on the calibration procedure
more or different points may be required.
Several load steps reveal
- linearity,
- repeatability,
- range-dependent behavior,
- hysteresis where applicable.
Particularly important
If a sensor operates mainly at:
5 … 20 % of its rated range
in service, a calibration performed exclusively in the upper half of the measuring range may provide little useful information for the actual application.
Increasing and decreasing load series
If the force is increased step by step, this produces an:
increasing load series
Example
0 → 5 → 10 → 15 → 20 kN
The force can then be reduced again
20 → 15 → 10 → 5 → 0 kN
This is a decreasing load series
Comparing both directions shows whether the same force value is indicated differently depending on the previous loading history.
This characteristic
is relevant for applications in which forces both:
increase
and:
decrease
.
Understanding hysteresis in force transducers
A force transducer can provide different signals at the same force depending on whether the force was previously:
increased
or:
decreased
.
Example
With increasing load:
10 kN → Indication 10,01 kN
with decreasing load:
10 kN → Indication 9,98 kN
Difference
30 N
This reversibility error or hysteresis
can be influenced, among other things, by:
- the measuring body,
- mechanical connection components,
- joints,
- friction,
- the calibration equipment
.
Therefore
The hysteresis of a complete installed measurement chain is not necessarily identical to the data-sheet specification of the individual force transducer.
Checking zero before and after loading
The unloaded output value provides important information.
Before calibration
the zero value should be documented after sufficient stabilization.
After a complete loading series
the force is removed again.
The following is then checked:
Does the sensor return to its original zero value?
A zero-point shift can indicate
- settling effects,
- mechanical stress,
- temperature changes,
- overload,
- permanent deformation.
Particularly noticeable
is a zero-point change that does not stabilize after several loading cycles.
Checking repeatability
A single loading cycle is not sufficient to assess the reproducibility of a measuring system.
Several load series are therefore performed
and the results at identical force steps are compared with one another.
Example at 10 kN
Series 1: 10,004 kN
Series 2: 10,006 kN
Series 3: 10,003 kN
Small variation
indicates good repeatability under the given conditions.
Large variation
can, by contrast, indicate:
- varying force introduction,
- friction,
- loose connection components,
- electrical interference,
- temperature changes
.
Calibrate the sensor or the complete measurement chain?
A force transducer initially provides an electrical signal.
Depending on the version, for example
mV/V
or, with integrated electronics:
4 … 20 mA
or:
0 … 10 V
In actual use, however, the measurement chain often consists of
Force transducer → Cable → Amplifier → Display / PLC / Data acquisition
If only the force transducer is calibrated
additional deviations from the:
- power supply,
- amplifier electronics,
- analog input card,
- scaling,
- display
are not automatically included in the calibration.
For the application, it may therefore be useful
to calibrate the:
complete measurement chain
.
Advantage
The documented measured value then corresponds more closely to the configuration actually used.
Considering temperature and stabilization
Force transducers do not respond exclusively to mechanical force.
Temperature can influence
- zero signal,
- rated output,
- mechanical dimensions,
- measurement amplifier,
- force introduction components.
The measurement chain should therefore
be allowed sufficient time to acclimatize to the ambient temperature before high-accuracy calibration.
Problematic
would be, for example:
Sensor from cold storage → immediate precision calibration at room temperature
Self-heating
caused by electronics or neighboring machine components may also be relevant.
What role does DIN EN ISO 376 play?
DIN EN ISO 376 describes the calibration of force-proving instruments used for the static verification of uniaxial testing machines.
The standard is therefore particularly relevant
for force measuring instruments used, for example, to verify:
- tensile testing machines,
- compression testing machines,
- materials testing machines
.
Depending on the intended use
the standard distinguishes, among other things, between:
calibration using increasing forces only
and:
calibration using increasing and decreasing forces
For reversible use
increasing and decreasing loads are taken into account in order to assess behavior during load reversal and the reversibility error.
Preloading
is also part of the normative calibration procedure.
Important
Not every industrial force measurement automatically has to be calibrated according to DIN EN ISO 376.
The applicable procedure depends on:
- measurement task,
- quality requirements,
- intended use,
- standards and customer specifications
.
Measurement uncertainty in force calibration
The calibration result always has a measurement uncertainty.
Possible contributions include
- uncertainty of the reference force,
- display resolution,
- repeatability,
- reproducibility,
- zero-point behavior,
- hysteresis,
- interpolation,
- temperature,
- alignment,
- force introduction,
- measurement amplifier.
Important
The accuracy of the reference system alone therefore does not determine the uncertainty of the complete calibration.
Example
A highly accurate reference force is of only limited benefit if the device under test is:
installed at an angle
and therefore generates poorly reproducible parasitic forces.
Therefore
The mechanical quality of the test setup and the metrological quality of the reference are directly linked in force calibration.
Recommended calibration procedure for tension/compression force transducers
- Define the measurement task: Tension, compression or both directions?
- Define the calibration range: Specify the force range actually required.
- Determine the calibration procedure: Define factory calibration, traceable calibration or a standard-based procedure.
- Identify the force transducer: Document type, rated force, serial number and output signal.
- Define the force introduction components: Select suitable threads, rod ends, compression pieces and adapters.
- Inspect components: Check threads, pins and contact surfaces for damage.
- Connect the measurement chain electrically: Connect sensor, amplifier and display according to the later application.
- Allow warm-up or temperature stabilization: Allow the measurement chain to adapt to ambient conditions.
- Align the force axis: Align the reference machine, force transducer and force introduction components.
- Avoid transverse forces: Check the connection structure for lateral forces.
- Allow rod ends to align freely: For tensile measurements, ensure that they are neither at their end stops nor mechanically stressed.
- Check compression surfaces: For compression calibration, ensure parallel and clean contact surfaces.
- Document zero: Record the output value in the unloaded condition.
- Preload: Condition the measurement chain according to the specified calibration procedure.
- Check zero again: After preloading, verify that the initial condition is stable.
- Run an increasing load series: Apply the defined force steps one after another.
- Observe stabilization time: Record the measured value only after sufficient stabilization.
- Perform another measurement series: Check repeatability.
- If required, perform a decreasing load series: Evaluate hysteresis or reversibility.
- Check tension and compression separately: If both are relevant in later operation.
- Check zero after unloading: Document any permanent zero-point shift.
- Determine measurement deviation: Compare the indications with the reference force.
- Evaluate measurement uncertainty: Consider the relevant influencing quantities.
- Document the calibration result: Record measurement points, loading direction, installation conditions and the measurement chain used.
Typical errors when calibrating force transducers
| Observation | Possible cause | Recommended check |
|---|---|---|
| Measured value changes after reinstallation | Different force introduction or mechanical stress | Check installation and force axis |
| First measurement series differs from subsequent series | Settling effects or insufficient preloading | Perform defined preloading cycles |
| Sensor shows different values at the same force | Poor repeatability or varying parasitic forces | Check force introduction and mounting |
| Increasing and decreasing loads produce different values | Hysteresis or friction in the system | Compare both load series |
| Zero point shifts after loading | Settling, mechanical stress or overload | Check zero after each loading cycle |
| Tensile measurement is stable, compression measurement is not | Different force introduction | Check compression surfaces and centering |
| Compression value depends on sensor position | Off-center loading | Check force axis and support surface |
| Measured value changes when a tie rod is tightened | Torsional or bending moment | Repeat installation without mechanical stress |
| Rod end is fitted but transverse load remains high | Joint is blocked or parallel offset is too large | Check freedom of movement and overall geometry |
| Value drifts during calibration | Temperature change or electronics not stabilized | Check temperature and warm-up time |
| Sensor alone is correct, but complete machine shows deviation | Measurement amplifier, scaling or mechanics | Check complete measurement chain |
| Deviation increases as force increases | Linearity error or load-dependent parasitic forces | Check several load points and mechanical alignment |
Practical example: calibrating a 20-kN tension/compression force transducer
A force transducer with a rated range of:
0 … 20 kN
is to measure both tensile and compressive forces in a test fixture.
Step 1: Define the mechanical setup
For tension:
Rod end → Sensor → Rod end
are used.
Step 2: Align the force axis
The tensile members are installed so that the sensor is not pulled sideways.
Step 3: Preloading
Before the actual measurement series begins, the measurement chain is loaded and unloaded according to the specified calibration procedure.
Step 4: Increasing tensile forces
For example:
0 → 4 → 8 → 12 → 16 → 20 kN
Step 5: Decreasing tensile forces
If hysteresis or reversibility is relevant:
20 → 16 → 12 → 8 → 4 → 0 kN
Step 6: Check zero
After complete unloading, it is checked whether the output signal returns to its initial value.
Step 7: Prepare the compression setup
Suitable force introduction components are used for compression calibration.
The contact surfaces are:
- cleaned,
- centered,
- aligned parallel.
Step 8: Condition the compression direction separately
The measurement chain is also preloaded in the compression direction in accordance with the calibration procedure.
Step 9: Perform compression measurement series
The same force steps or the force steps specified for the application are applied.
Step 10: Compare the results
The following are evaluated:
- deviation from the reference,
- repeatability,
- hysteresis,
- zero return,
- difference between tension and compression directions.
Result
The statement “force transducer 0 … 20 kN calibrated” alone is insufficient. For a reliable assessment, the loading direction, force introduction components and mechanical conditions under which the calibration was performed must also be documented.
Suitable ICS products for tension and compression force measurement
WIKA Type F2303 – Tension/Compression Force Transducer with Rod End up to 45 kN
For applications with axial tensile and compressive forces, ICS offers the:
ICS specifies
- measuring ranges from 0 … 10 kN to 0 … 45 kN,
- corrosion-resistant stainless steel design,
- integrated amplifier,
- high long-term stability,
- high shock and vibration resistance,
- good reproducibility,
- easy installation.
Typical applications according to ICS
- machine and plant engineering,
- production automation,
- presses,
- lifting cylinders,
- welding tongs,
- drives.
Output signals
ICS specifies, among other things:
4 … 20 mA
and:
0 … 10 V
Particularly relevant to this article
is the rod end because it enables practical mechanical integration into axially loaded structures.
However, the rod end does not replace correct overall alignment of the force line.
WIKA Type F2802 – S-Type Tension/Compression Force Transducer up to 50 kN
For conventional tension/compression measurements, ICS also offers the:
ICS specifies
- measuring ranges from 0 … 0,5 kN to 0 … 50 kN,
- stainless steel or steel design,
- degree of protection IP65 for measuring ranges below 5 kN,
- degree of protection IP67 from 5 kN.
Applications
include:
- tensile and compressive force testing,
- vessel weighing,
- load monitoring in industrial plants.
Important installation note
ICS explicitly states that the measuring force must be introduced:
centrally and without transverse forces
.
WIKA Type F2822 – Tension/Compression Force Transducer for Materials Testing up to 500 kN
For higher forces and applications in materials testing, ICS offers the:
ICS specifies
- measuring ranges from 0 … 5 kN to 0 … 500 kN,
- low installation height,
- steel design,
- degree of protection IP66.
Typical applications
- materials testing machines,
- load monitoring,
- production lines,
- measurement, testing and inspection equipment,
- special-purpose machinery.
The same applies here
The force must be introduced:
centrally and without transverse forces
.
Which solution is suitable?
| Application | Suitable ICS solution |
|---|---|
| Tension/compression measurement with rod-end connection up to 45 kN | WIKA F2303 |
| Classic S-type for tension and compression testing up to 50 kN | WIKA F2802 |
| Materials testing and higher forces up to 500 kN | WIKA F2822 |
| Very small tensile/compressive forces from 10 N | Consider WIKA F2220 or F2221 depending on the application |
| Very high forces | Select further WIKA tension/compression force transducers according to measuring range and installation conditions |
An overview can be found under WIKA Tension/Compression Force Transducers at ICS Schneider.
Conclusion
Precise force calibration does not begin with the first calibration point.
It begins with:
mechanical force introduction
Tension and compression directions must be considered separately
The different force introduction components can result in different mechanical conditions.
The force must act axially
Transverse forces, bending moments and torsion change the loading condition of the force transducer.
Rod ends help with tensile measurements
They can compensate for small angular deviations and reduce constraint moments.
However, they do not replace a correctly aligned overall structure.
Preloading improves reproducibility
Mechanical contact points can settle.
A defined preloading procedure therefore provides more comparable initial conditions.
Increasing and decreasing forces reveal hysteresis
If a measurement chain will later be used with both increasing and decreasing forces, this behavior should also be taken into account during calibration.
The complete measurement chain can be critical
In addition to the sensor, the following also influence the result:
- force introduction,
- amplifier,
- display,
- wiring,
- temperature
.
For practical applications
Define measurement task → define tension and compression → determine force range → select suitable force transducer → select appropriate force introduction components → precisely align force axis → avoid transverse forces and bending moments → install rod ends without mechanical stress → connect electrical measurement chain → stabilize temperature → check zero → apply defined preload → apply load steps → repeat measurement series → record increasing and decreasing forces where required → evaluate tension and compression separately → check zero return → determine measurement deviation and measurement uncertainty → document the installation conditions in the calibration result.
FAQ: Correctly Calibrating Force Transducers in Tension and Compression
How is a force transducer calibrated?
A known traceable reference force is applied to the force transducer and its output signal or indication is compared with this reference.
Can a tension/compression force transducer be calibrated in both directions?
Yes. If both loading directions are relevant to the application, tension and compression should be taken into account accordingly.
Is accuracy automatically the same in tension and compression?
Not necessarily. Force introduction, installation, hysteresis and the mechanical loading of the measurement chain can differ between the two directions.
Why must the force be introduced axially?
The force transducer is designed for a defined load along its measuring axis. Lateral forces or moments can generate additional deformation and therefore measurement errors.
What is a transverse force?
A transverse force acts laterally or perpendicular to the intended measuring axis of the force transducer.
What is a bending moment?
A bending moment occurs, among other things, when the force is not applied along the sensor axis but at a lateral offset.
How is a bending moment generated by off-center force introduction?
In simplified form, M = F × e, where F is the force and e is the distance between the force line and the measuring axis.
What is a rod end?
A rod end is a mechanical connecting element with an articulated bearing that can permit small angular changes between two tensile members.
Why are rod ends used with tensile force transducers?
They help reduce constraint moments caused by small angular deviations of connected components and help guide the force axially through the sensor.
Does a rod end eliminate all transverse forces?
No. Large parallel offsets, lateral force application or blocked joints can still generate significant parasitic loads.
Do I need two rod ends?
This depends on the intended mechanical arrangement. In freely aligning tensile measurement chains, joints are frequently used at both ends so that the force line can align itself with as little mechanical stress as possible.
Can I completely lock a rod end?
If the articulation is blocked, it loses its compensation function. The specific installation must comply with the requirements of the respective sensor and force introduction component.
What must be considered for compressive force?
The force should be introduced centrally. Support and compression surfaces must suit the intended sensor geometry and must not generate impermissible transverse forces or bending moments.
Why are parallel compression surfaces important?
With non-parallel surfaces, the load may initially be introduced on one side only, causing off-center loading.
What does preload mean in force calibration?
In calibration, it often refers to defined preloading or conditioning of the measurement chain before the actual measurement series begins.
Why is a force transducer preloaded?
This can reduce mechanical settling effects and establish more reproducible initial conditions.
Is preloading the same as taring?
No. Preloading is a mechanical loading process. Taring or zeroing, by contrast, changes the assignment of the electrical or indicated zero value.
How often must preloading be performed?
This depends on the calibration procedure used and the underlying standard or guideline. For standard-based calibrations, the procedure specified there is decisive.
What are load steps?
They are defined reference forces that are applied consecutively within the calibration range.
Why are several load steps required?
They allow the behavior of the sensor to be assessed across the measuring range instead of at only one force value.
What does increasing load mean?
The force is increased step by step from a lower value to higher force levels.
What does decreasing load mean?
After reaching a high force level, the force is reduced step by step.
What is hysteresis in a force transducer?
Hysteresis describes the dependence of the measurement signal on the previous loading history. At the same force, different values may occur during increasing and decreasing loading.
Why should zero be checked after loading?
A permanent zero-point change can indicate settling, mechanical stress or overload.
What does repeatability mean?
It describes how well the measurement result can be reproduced when the same force is repeatedly applied under identical conditions.
Why is a single measurement series not sufficient?
Without repetition, it is difficult to determine whether a measured value is stably reproducible or occurred randomly due to force introduction and other influencing quantities.
Should the force transducer be calibrated alone or together with the measurement amplifier?
This depends on the required statement. If the amplifier is part of the later measurement chain, calibrating the complete measurement chain can be particularly useful for the application.
Why does the measurement amplifier influence the result?
It processes the output signal of the force transducer and has its own characteristics such as gain, zero point, linearity and temperature dependence.
Why is temperature important during force calibration?
The measuring body, electronics and mechanical force introduction components can all respond to temperature changes.
What is DIN EN ISO 376?
DIN EN ISO 376 describes a method for calibrating force-proving instruments used for the static verification of uniaxial testing machines.
Does every force transducer have to be calibrated according to DIN EN ISO 376?
No. Whether this procedure is required or appropriate depends on the application, quality requirements and applicable customer specifications or standards.
Why are increasing and decreasing forces measured in certain calibrations?
This allows the behavior of the force measuring instrument during load reversal and its reversibility to be assessed.
What influences the measurement uncertainty of force calibration?
Factors include the reference force, repeatability, resolution, zero point, hysteresis, temperature, alignment, force introduction and the electronics used.
Can an inaccurate installation cause a highly accurate sensor to measure inaccurately?
Yes. Transverse forces, bending moments or mechanical stress can significantly reduce practical measurement quality.
What is the WIKA F2303?
The WIKA F2303 listed by ICS is a tension/compression force transducer with thin-film technology and rod end for measuring ranges from 0 … 10 kN to 0 … 45 kN.
Which output signals does the WIKA F2303 provide?
ICS specifies active output signals including 4 … 20 mA and 0 … 10 V. Further options may be available depending on the version.
What is the F2303 suitable for?
ICS lists applications in machine and plant engineering, production automation, presses, lifting cylinders, welding tongs and drives.
What is the WIKA F2802?
The F2802 is an S-type tension/compression force transducer listed by ICS with measuring ranges from 0 … 0,5 kN to 0 … 50 kN.
What is important when installing the F2802?
ICS states that the measuring force must be introduced centrally and without transverse forces.
What is the WIKA F2822?
The F2822 is a tension/compression force transducer listed by ICS for materials testing and other industrial testing applications, with measuring ranges from 0 … 5 kN to 0 … 500 kN.
Where can I find the WIKA F2303 at ICS Schneider?
Further information can be found under WIKA F2303 Tension/Compression Force Transducer at ICS Schneider.
Where can I find the WIKA F2802 at ICS Schneider?
Further information can be found under WIKA F2802 Tension/Compression Force Transducer at ICS Schneider.
Where can I find the WIKA F2822 at ICS Schneider?
Further information can be found under WIKA F2822 Tension/Compression Force Transducer at ICS Schneider.
Where can I find additional tension/compression force transducers at ICS Schneider?
An overview can be found under WIKA Tension/Compression Force Transducers at ICS Schneider.