


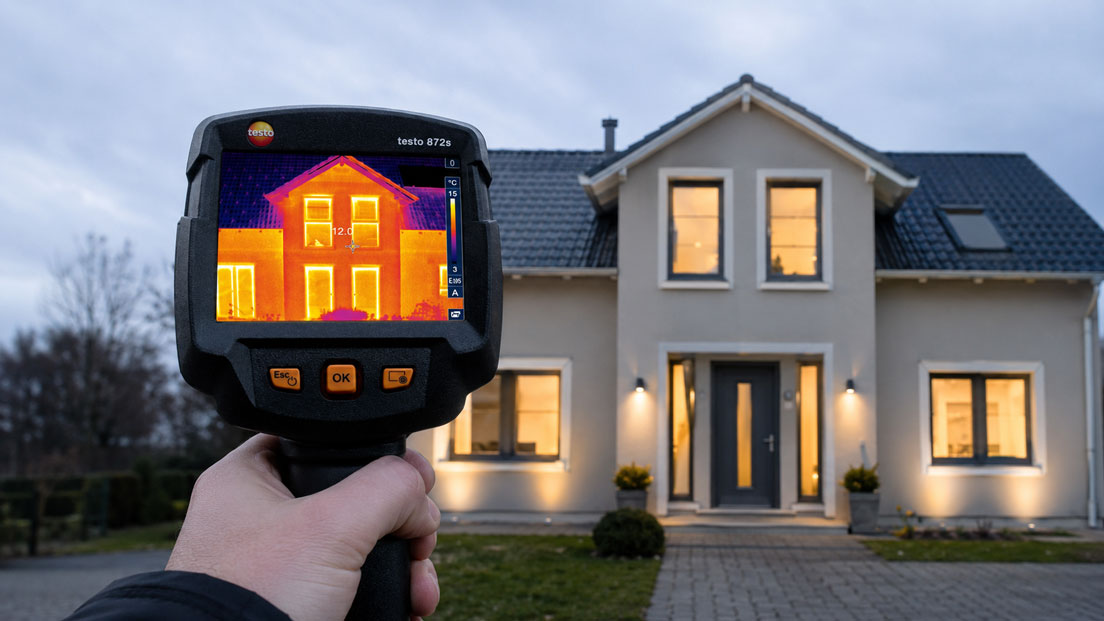
With a thermal imaging camera, temperature distributions on buildings can be made visible quickly and clearly. Especially in energy audits, building thermography, renovation planning, facility management and technical building inspections, thermal anomalies can provide valuable information. Thermal bridges, leaking window connections, missing or poorly installed insulation, suspected moisture or unevenly operating heating surfaces often only become clearly visible in the thermal image.
However, it is important to understand that a thermal imaging camera does not directly show “moisture” or “insulation”. It shows surface temperatures or temperature differences. Experts can draw conclusions from these temperature images if measurement conditions, emissivity, reflections, indoor and outdoor temperatures as well as the building context are taken into account. This is precisely why building thermography is not simply a matter of “taking a picture”, but a measurement task that must be carefully prepared and professionally interpreted.
This article explains how thermal imaging cameras are used for buildings and energy audits, which fault patterns can become visible, which measurement conditions are important and what to consider when selecting a suitable thermal imaging camera.
Table of contents
- Why thermal imaging cameras are useful for buildings
- What does a thermal imaging camera really show?
- Detecting and correctly interpreting thermal bridges
- Making insulation defects and air leaks visible
- Assessing suspected moisture with thermography
- Measurement conditions: temperature difference, weather and time of day
- Indoor or outdoor measurement: Which method is useful?
- Emissivity, reflections and typical measurement errors
- Selecting a thermal imaging camera: resolution, NETD and focus
- Documentation and report for energy audits and renovation
- Practical example: Investigating heat loss in an existing building
- Which measuring instruments / products are suitable?
- Conclusion: Thermography provides indications, but not an automatic diagnosis
- FAQ: Frequently asked questions about building thermography
Why thermal imaging cameras are useful for buildings
Buildings do not lose heat evenly. In practice, heat loss often occurs at specific points: window connections, roller shutter boxes, balcony slabs, roof connections, building corners, radiator niches, poorly insulated façade areas or leaking component joints. These points are often not visible to the naked eye. A thermal imaging camera makes temperature differences visible and therefore helps to locate weak points more precisely.
This is particularly valuable for energy audits and renovation decisions. Instead of only discussing the U-value of a component or the energy consumption of a building theoretically, thermography can show concrete anomalies in the existing structure. This makes it easier to prioritize renovation measures. A leaking window connection requires a different measure than extensive insufficient insulation or a thermal bridge caused by a cantilevered concrete slab.
Thermography is also useful in facility management and technical building maintenance. Radiators, underfloor heating systems, hot water pipes, ventilation outlets, electrical distribution boards or poorly tempered rooms can be examined without contact. This saves time and reduces effort because conspicuous areas quickly become visible.
The thermal imaging camera is particularly useful when it is not viewed in isolation. Good results are achieved by combining thermal image, visual image, knowledge of the building, measurement conditions and supplementary measurements. These may include surface temperature, room temperature, outdoor air temperature, humidity or material moisture.
| Application | What the thermal imaging camera can make visible | Important note |
|---|---|---|
| Energy audit | Heat loss, insulation defects, thermal weak points | Thermography supplements the energy assessment, but does not replace it. |
| Renovation planning | Priorities for windows, façade, roof or connection details | Component structure and measurement conditions must be taken into account. |
| Facility management | Heating problems, uneven heat distribution, technical anomalies | Comparative measurements of similar areas are particularly helpful. |
| Suspected moisture | Cool surface areas, evaporative cooling, possible risk zones | Moisture must be confirmed with suitable moisture measuring instruments. |
| Building acceptance | Anomalies at connections, insulation, windows or airtightness | Ideally carried out under defined boundary conditions. |
What does a thermal imaging camera really show?
A thermal imaging camera measures the infrared radiation of a surface and uses it to calculate a temperature representation. The result is a thermal image in which temperature differences are displayed in color. Depending on the color palette, warm areas may appear bright or red, while cool areas may appear dark or blue. The coloring itself is only a visualization aid; the decisive factors are temperature values, temperature differences and the building context.
The camera does not “look through the wall”. It shows the temperature of the visible surface. If there is an insulation defect, an air leak or a damp area behind a wall, this can affect the surface temperature. The anomaly then becomes indirectly visible in the thermal image. It is therefore an interpretation of thermal surface patterns.
For this reason, thermal images should not be evaluated too hastily. A cool area may be caused by a thermal bridge, but also by drafts, moisture, reflection, a material change, shading or a different surface condition. Similarly, a warm area on the exterior façade may indicate heat loss, but it can also be caused by solar radiation, stored heat or reflected thermal radiation.
Professional building thermography therefore considers not only the thermal image, but also the measurement situation. Indoor and outdoor temperatures, weather, time of day, solar exposure, wind, humidity, emissivity and distance influence the reliability of the findings. Only when these factors are considered can reliable indications be derived.
Detecting and correctly interpreting thermal bridges
Thermal bridges are areas of a building where heat flows out faster than in the surrounding construction. Typical examples are building corners, balcony connections, window reveals, lintels, ring beams, roller shutter boxes, floor supports or connections between roof and wall. Indoors, thermal bridges often appear as cooler surface areas when the outside air is cold.
Thermography can make such areas visible because the surface temperature at the thermal bridge differs from its surroundings. Indoors, the thermal bridge usually appears as a cooler area; outdoors, on a heated building, it often appears as a warmer area. The exact representation depends on which side is being measured and which temperature conditions are present.
Thermal bridges are not only relevant for energy efficiency. They can also increase the risk of mold because colder interior surfaces reach the dew point more quickly. Especially in room corners, behind furniture, at window reveals or at poorly insulated connections, this can create a critical moisture level.
However, a distinction must be made between structural thermal bridges and execution defects. A building corner is always somewhat more critical in terms of building physics than a flat wall surface. A missing insulation strip, a poorly sealed window connection or a continuous concrete component, on the other hand, may be an avoidable planning or installation defect. Thermography shows the anomaly; the technical building assessment must then be carried out professionally.
| Typical area | Possible thermal anomaly | Possible cause |
|---|---|---|
| Window reveal | Cool interior surface or warm exterior edge | Thermal bridge, leakage or poor connection. |
| Roller shutter box | Significantly different temperature compared to the wall surface | Weak insulation or air leakage. |
| Balcony slab | Linear heat losses | Continuous component or insufficient thermal separation. |
| Building corner | Cooler inner corner | Geometric thermal bridge and reduced air circulation. |
| Roof connection | Irregular temperature distribution | Insulation defect, connection problem or air flow. |
Making insulation defects and air leaks visible
Insulation defects often appear in the thermal image as irregular areas, stripes, spots or clearly defined temperature differences. Under suitable measurement conditions, a uniformly constructed wall should show a relatively homogeneous temperature image. If individual areas appear significantly cooler or warmer, this may indicate missing insulation, compressed insulation material, cavities or faulty installation.
For sloped roofs, drywall constructions or façade renovations, thermography can help identify incompletely insulated areas. Particularly conspicuous are places where insulation material is missing or where air flows behind it. In such cases, irregular temperature patterns often occur that differ from normal structural thermal bridges.
Air leaks are a separate issue. They occur at joints, penetrations, window connections, roof connections or installation openings. When warm indoor air flows out or cold outdoor air enters, the surface temperature in the surrounding area changes. This can make stripe-like or local temperature deviations visible in the thermal image.
The investigation of air leaks becomes particularly meaningful in combination with a differential pressure method, such as a blower door test. The underpressure or overpressure generated intensifies leaks, making their thermal effect more clearly visible. Without such boundary conditions, air leaks may be harder to detect depending on weather, wind direction and temperature difference.
Assessing suspected moisture with thermography
Damp areas can become noticeable in the thermal image because evaporation removes heat and damp materials may have different thermal properties than dry areas. As a result, affected areas often appear cooler than their surroundings. This can be useful in cases of water damage, leaking pipes, thermal bridges with condensation risk, flat roof problems or damp basement walls.
Nevertheless, a thermal imaging camera is not a moisture meter. It does not show moisture values in percent and cannot confirm on its own whether a component is actually damp. A cool area may also be caused by drafts, material changes, shading or reflection. Therefore, suspected moisture should always be verified using suitable moisture measuring instruments, knowledge of the building component and, if necessary, further test methods.
In practice, thermography is particularly well suited to narrowing down search areas. Instead of opening up an entire wall or ceiling over a large area, conspicuous areas can be checked specifically. This is especially helpful for leak detection, renovation planning and damage documentation.
In the case of suspected moisture in a building, the indoor air is also important. Temperature, relative humidity and dew point determine whether there is a risk of condensation. A cold surface is not automatically moisture damage. It becomes critical when the surface temperature is low enough for condensation to form at the existing indoor humidity level.
| Thermal anomaly | Possible interpretation | Supplementary test |
|---|---|---|
| Cool spot on wall or ceiling | Suspected moisture, draft or material change | Material moisture measurement and visual inspection. |
| Cool corner indoors | Thermal bridge with possible condensation risk | Check indoor humidity, surface temperature and dew point. |
| Irregular pattern below flat roof | Possible moisture penetration or insulation problem | Include roof structure, weather conditions and further measuring methods. |
| Linear cool area | Pipe, air flow or component connection | Use building plans, pipe routing and comparative measurement. |
Measurement conditions: temperature difference, weather and time of day
The reliability of building thermography depends heavily on the measurement conditions. A sufficient temperature difference between inside and outside is particularly important. The greater the thermal driving force, the more clearly heat losses, thermal bridges and insulation defects become visible. If indoor and outdoor temperatures are almost the same, many anomalies are barely detectable.
For classic building inspections, thermographic measurements are often carried out during the cold season when the building is heated and the outdoor temperature is significantly lower. This creates clear temperature differences between indoor and outdoor surfaces. For certain questions, such as summer overheating, roof surfaces or technical systems, other conditions may be useful.
Solar radiation is a frequent disturbing factor. It heats façades, window frames, roof surfaces or components and can significantly distort thermal images. A façade that has been exposed to sunlight during the day can still emit stored heat hours later. It then appears conspicuously warm in the thermal image, although this is not necessarily due to heat loss from inside the building.
Wind and precipitation also influence the measurement. Wind cools surfaces and can change temperature differences. Rain or wet surfaces lead to evaporative cooling and reflection effects. For many building thermography applications, dry, low-wind and as uniform as possible conditions are therefore advantageous.
| Boundary condition | Why it is important | Typical recommendation |
|---|---|---|
| Temperature difference indoors/outdoors | Makes heat losses and thermal bridges visible | Preferably a clear difference between heated indoor space and outdoor air. |
| Solar radiation | Heats components and distorts the assessment | Avoid direct sunlight before and during the measurement. |
| Wind | Cools surfaces and influences leaks | Choose conditions with as little wind as possible. |
| Precipitation | Wet surfaces change temperature and reflection | Do not assess heavily wet façade surfaces. |
| Time of day | Stored heat can distort thermal images | Often measure early in the morning or after a longer cooling phase. |
Indoor or outdoor measurement: Which method is useful?
Building thermography can be performed from inside and outside. Both methods provide different information. An outdoor image shows where heat escapes to the outside through the building envelope. It is particularly suitable for an overview of façades, roofs, window areas or building corners. However, outdoor measurement is more strongly influenced by weather, sun, wind and surface reflections.
Indoor images are often more meaningful when it comes to comfort, mold risk, cold surfaces, window connections or thermal bridges inside rooms. They show which surface temperatures actually occur in the room. This is important when assessing whether a surface becomes critically cold or whether users complain about drafts, cold walls or uneven room temperatures.
In many cases, a combination of indoor and outdoor measurement is most useful. Outdoor images provide an overview of the building envelope. Indoor images show details and help assess relevance for indoor climate, dew point risk and user comfort. In addition, visual images and notes on the measurement situation significantly improve later evaluation.
For energy audits and renovation planning, it should be defined in advance which question is to be answered. For searching heat losses on the façade, outdoor measurement is the obvious choice. For mold risk, cold interior surfaces and detailed connections, indoor measurement is often more decisive.
Emissivity, reflections and typical measurement errors
Emissivity describes how well a surface emits thermal radiation. Materials such as plaster, masonry, wood or painted surfaces can usually be assessed relatively well thermographically. Shiny metals, glass or highly reflective surfaces, on the other hand, are more problematic. They reflect thermal radiation from the surroundings and can therefore create false temperature readings.
Windows are a typical example. Glass cannot simply be assessed in the thermal image like a normal wall surface. It often reflects the sky, buildings, people or warm objects in the surroundings. Glass surfaces may therefore appear conspicuous in the thermal image without the display directly corresponding to the actual surface temperature.
The measurement angle also plays a role. The shallower the angle to the surface, the stronger reflections and measurement errors can become. Therefore, relevant surfaces should be measured as perpendicular as possible. When taking façade images from a large distance or at an unfavorable angle, the reliability of the result must be assessed critically.
Another source of error is the automatic scaling of the thermal imaging camera. If the color scale is automatically adjusted to the coldest and warmest point in the image, small differences can appear very dramatic or larger differences can be visually weakened. For comparison images, the temperature scale should be selected and documented deliberately whenever possible.
Selecting a thermal imaging camera: resolution, NETD and focus
Not every thermal imaging camera is equally suitable for building thermography. A simple camera may be sufficient for quick overviews and rough temperature differences. For detailed energy audits, façade analysis, small thermal bridges or meaningful reports, however, resolution, thermal sensitivity, focus and software functions are decisive.
IR resolution determines how many temperature measurement points are available in the thermal image. The higher the resolution, the more details can be detected. This is particularly important at greater distances, on small components, window connections or fine temperature patterns. Too low a resolution can cause details to blur or small thermal bridges to remain undetected.
Thermal sensitivity, often specified as NETD, describes how small the temperature differences are that the camera can distinguish. In building thermography, small temperature differences are often important. Better thermal sensitivity helps make subtle differences on wall surfaces, insulation areas or connection details visible.
Focus is also important. Blurred thermal images lose measurement quality. With simple cameras with fixed focus, operation can be uncomplicated; for more demanding inspections, manual or automatic focus is helpful. For professional reports, a visual camera, image fusion, measuring points, temperature profiles, notes and report generation software are also useful.
| Criterion | Importance for building thermography | Practical benefit |
|---|---|---|
| IR resolution | Number of thermal measurement points | More details on façades, windows and connection areas. |
| NETD | Detectability of small temperature differences | Better representation of subtle thermal bridges or insulation differences. |
| Focus | Sharpness of the thermal image | Important for reliable measurement images and documentation. |
| Temperature range | Measuring range of the camera | Usually moderate for buildings, but technical systems may require higher ranges. |
| Image fusion | Combination of visual image and thermal image | Makes it easier to assign components and details. |
| Software / report | Documentation and evaluation | Important for energy audits, renovation and damage documentation. |
Documentation and report for energy audits and renovation
Good building thermography does not end with the captured thermal image. For energy audits, renovation planning or damage assessment, traceable documentation is essential. This includes the thermal image, visual image, measuring location, date, time, indoor and outdoor temperature, weather conditions, distance, viewing direction and a professional description of the anomaly.
It is particularly important to distinguish between observation and assessment. An observation might be: “In the area of the window reveal, the interior surface temperature is lower than on the adjacent wall surface.” The assessment might then be: “This may indicate a thermal bridge, leakage or insufficient connection insulation.” A final statement may require further testing.
For renovations, it is helpful not only to document anomalies individually, but also to prioritize them. A small thermal anomaly without practical relevance should be assessed differently from a large-area heat loss zone or an area with mold risk. The report should therefore contain not only images, but also a clear classification.
For recurring inspections, comparability is important. If a building is examined thermographically before and after renovation, measurement conditions should be as similar as possible. Only then can changes be assessed meaningfully.
Practical example: Investigating heat loss in an existing building
A facility management team wants to assess the energy performance of an older administrative building. Users report cold areas at several window workstations, drafts and increased heating costs. The aim of the investigation is not a complete energy calculation, but to narrow down conspicuous building components for later renovation planning.
The measurement is carried out on a cold, dry morning. The building was heated overnight, and direct solar radiation on the affected façade areas is avoided. First, exterior images of the façade are taken. Several window areas and a continuous connection area between the floor slab and façade are thermally conspicuous.
Interior images are then taken. In several rooms, the thermal images show cool zones at window reveals and in the upper room corners. The surface temperatures are documented and compared with room temperature and relative humidity. In two areas, there is an increased risk of condensation if the rooms are operated continuously with high humidity.
The investigation shows that the entire façade is not uniformly problematic. The main anomalies are window connections, roller shutter boxes and individual connection details. This allows renovation planning to be more targeted. Instead of examining the entire façade in general terms, window connections, airtightness and critical thermal bridges are checked more closely first.
The example shows how thermography provides practical indications. It does not replace a complete building physics assessment, but makes visible where closer inspection is required.
Which measuring instruments / products are suitable?
For simple building thermography, quick on-site checks and initial energy checks, thermal imaging cameras from the basic thermal imaging cameras category are suitable. They are particularly interesting when temperature differences need to be made visible quickly, simple reports created or technical and building-related anomalies documented in everyday use.
For more demanding energy audits, more detailed building analyses, technical documentation and recurring inspections, advanced thermal imaging cameras are useful. Higher resolution, better thermal sensitivity, extended analysis functions and better documentation options make it easier to evaluate small temperature differences and complex building structures.
If very detailed investigations, professional reports, large buildings or demanding inspection tasks are the focus, premium thermal imaging cameras can also be useful. Depending on the version, they offer higher performance, more extensive analysis functions and more reserves for professional thermography tasks.
As a supplement to the thermal imaging camera, moisture and temperature measuring instruments can be helpful. Especially in cases of suspected moisture, mold risk or dew point assessment, the thermal image alone is not sufficient. Room temperature, relative humidity, surface temperature and, if necessary, material moisture should then also be recorded.
| Product area | Typical use | Particularly relevant for |
|---|---|---|
| Basic thermal imaging cameras | Quick thermal inspection and simple building thermography | Initial energy checks, facility management and simple inspections |
| Advanced thermal imaging cameras | More detailed building, electrical and industrial analyses | Energy audits, renovation planning and professional documentation |
| Premium thermal imaging cameras | Professional thermography with high requirements | Large buildings, detailed reports and demanding measurement tasks |
| Moisture measuring instruments / humidity sensors | Supplementary check of indoor climate and suspected moisture | Dew point assessment, mold risk and damage analysis |
Conclusion: Thermography provides indications, but not an automatic diagnosis
A thermal imaging camera is a very effective tool for building thermography, energy audits, renovation planning and facility management. It makes temperature differences visible that cannot be detected with the naked eye and helps to narrow down thermal bridges, insulation defects, air leaks or suspected moisture in a targeted manner.
However, the most important limitation is equally clear: thermography shows surface temperatures, not causes. A conspicuous thermal image must be interpreted professionally. Measurement conditions, weather, emissivity, reflections, indoor and outdoor temperatures as well as the building context determine how reliable the statement is.
Compact thermal imaging cameras are often sufficient for simple inspections. For professional energy audits and detailed building analyses, higher resolution, good thermal sensitivity, focus function and reporting software are significantly more important. Anyone who uses thermography correctly obtains a powerful tool for building assessment, but should always verify the results with expertise and, where necessary, supplementary measurements.
FAQ: Frequently asked questions about building thermography
What is building thermography?
Building thermography is the inspection of buildings using a thermal imaging camera. Temperature distributions on surfaces are made visible in order to obtain indications of heat losses, thermal bridges, insulation defects or suspected moisture.
Can a thermal imaging camera see through walls?
No. A thermal imaging camera does not see through walls. It shows the temperature of the visible surface. Anomalies behind a wall can only become visible indirectly if they influence the surface temperature.
Can moisture be measured with a thermal imaging camera?
No, moisture is not measured directly. A thermal imaging camera can make cool areas visible that may indicate moisture. However, suspected moisture should be checked with a suitable moisture measuring instrument.
When is the best time for building thermography?
For heat loss and thermal bridge inspections, the cold season is usually particularly suitable because interiors are heated and outdoor temperatures are significantly lower. Direct sunlight, rain and strong wind should be avoided whenever possible.
How large should the temperature difference between inside and outside be?
The greater the temperature difference, the more clearly heat losses become visible. For reliable building thermography, there should be a noticeable difference between the heated indoor space and the outdoor air.
What are thermal bridges?
Thermal bridges are areas where heat flows out faster than in the surrounding areas. Typical locations are building corners, window reveals, balcony connections, roller shutter boxes or floor supports.
Why are thermal bridges problematic?
They increase heat loss and can lead to colder interior surfaces. At corresponding indoor humidity levels, this increases the risk of condensation and mold growth.
Can insulation defects be detected with a thermal imaging camera?
Yes, under suitable conditions, insulation defects can become visible as temperature differences. However, the camera only shows the thermal effect, not the insulation material itself.
Why are thermal images sometimes difficult to interpret?
Because temperature images are influenced by many factors. These include weather, sun, wind, material, emissivity, reflection, measuring angle and the building structure.
What does emissivity mean?
Emissivity describes how strongly a surface emits thermal radiation. It affects the temperature measurement of the thermal imaging camera and must be considered especially with reflective surfaces.
Why are glass surfaces problematic?
Glass strongly reflects infrared radiation and is difficult to assess thermographically. Reflections of the sky, buildings or people can become visible in the thermal image and may not correspond to the actual surface temperature.
Is a simple thermal imaging camera sufficient for buildings?
For simple checks and rough anomalies, a basic camera may be sufficient. For professional energy audits, reports and detailed analyses, higher resolution, good NETD sensitivity and focus function are useful.
What does NETD mean for thermal imaging cameras?
NETD describes the thermal sensitivity of a thermal imaging camera. The smaller the value, the better the camera can make small temperature differences visible.
Why is IR resolution important?
IR resolution determines how many thermal measurement points the image contains. A higher resolution helps to detect smaller details, thermal bridges and connection problems more clearly.
Should measurements be taken indoors or outdoors?
Both can be useful. Outdoor images show heat losses at the building envelope. Indoor images are particularly helpful for cold surfaces, mold risk, window connections and user comfort.
Can thermography replace energy consulting?
No. Thermography is an important tool, but it does not replace a complete energy consultation or building physics assessment. It provides indications that must be further interpreted.
What belongs in a thermography report?
A good report includes thermal image, visual image, measuring location, date, time, weather conditions, indoor and outdoor temperature, description of the anomaly and professional interpretation.
Can underfloor heating be checked with thermography?
Yes, thermal imaging cameras can make the routing and function of underfloor heating visible if the heating is active and sufficient temperature differences are present.
Which errors frequently occur in building thermography?
Common errors include measurements during solar radiation, wet façades, insufficient temperature difference, incorrect interpretation of reflections or missing documentation of boundary conditions.
Which supplementary measuring instruments are useful?
Depending on the question, moisture meters, temperature probes, data loggers or indoor climate measuring instruments are useful. Especially in cases of suspected moisture, thermography should always be supplemented by further measurements.